Astronomy - Planetary imaging with Iris |
This tutorial will help you to process planetary videos with the free astronomy software Iris. You will be able to process videos made by one or several webcams plugged into your telescope, with the LRGB technique (B&W camera for details + color webcam for the colors) or even better with the right RGB (B&W camera for astronomy on which we place the 3 filters, one for each primary color).
With the LRGB technique, the image obtained using the B&W webcam will then be combined with a color image, the latter having been achieved with a simple color webcam (or B&W webcam with a set of R G B filters designed for astronomy).
REMARKS
If you shoot the planets with a B&W camera fitted with RGB filters, you will need to repeat the image processing for all 3 Black & White videos (representing the 3 primary colors) separately following the technique described below, before combining the 3 resulting images to get a single beautiful image, in color and well defined. This is not the case with color webcams that offer a poor image resolution.
If you have a single video made with a color webcam, go here (soon available) to view another tutorial!
If you use the LRGB technique (1 B&W video and 1 color video) you can follow this tutorial. ![]()
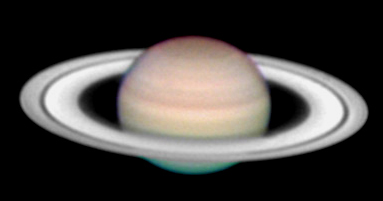
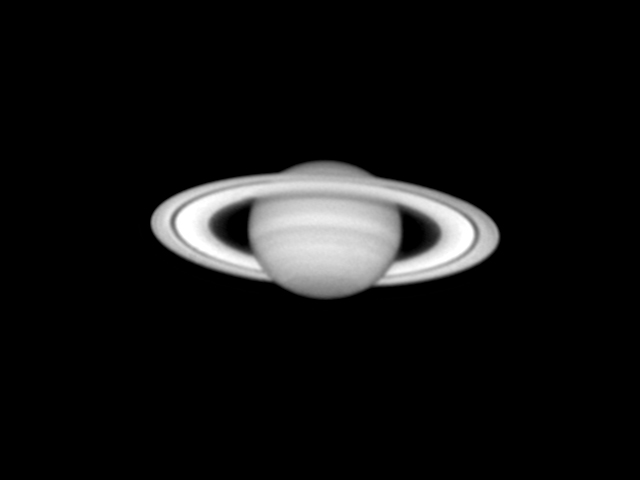

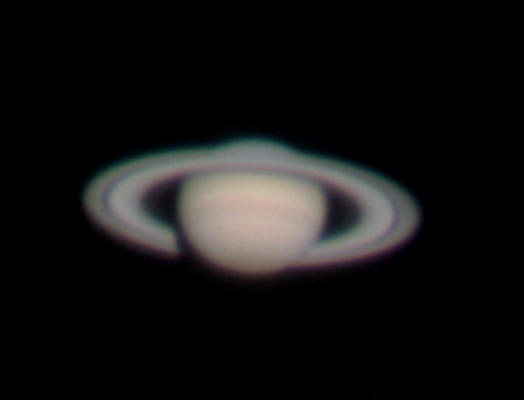


| Luminance (L) | Color (RGB) | LRGB |
|
Last version of Iris used : 5.57 Features of the tutorial :
|
Things that must be done first in order to get a high resolution image in RGB or LRGB...
1) You need a webcam or an astronomy camera with a B&W sensor, which will be used to obtain the luminance image (L) of the planet. This image will contain all relevant information (details) and will be associated with a color image (RGB) in order to obtain a beautiful detailed image in color (LRGB) of the planet.
2)
You also need a webcam with a color sensor, for example, a Philips ToUcamPro 3 (or earlier, widely used in amateur astronomy) whose correct name is SPC900NC/00. To achieve the best images, opt for the purchase of 3 colour filters (R, G and B) that will fit on your B&W camera. In this case, no need for a webcam with a color sensor!
And if you want to go further to increase the quality of your images...
1) You can switch your basic webcam to Raw mode (not for the B&W astro cameras, such as the DMK and Lumenera) to remove the image compression. The latter is due to the action of the internal software of your webcam. Without compression, images of planets are much better! To switch your webcam to Raw mode, go to the site of the french amateur astronomer Etienne Bonduelle, which describes how to change the internal software of your webcam.
2) Add an infrared filter (IR-UV cut 31.75mm) dedicated to astronomy on the webcam's adapter. Indeed, infrared rays emitted by planets degrade the images, thats why it is convenient to eliminate them by the addition of this filter. I use the Baader Ir-cut filter, well known in the small world of amateur astronomy, but Astronomik filters are of better quality (they are unfortunately much more expensive).
First, you have to create a new working directory on your hard drive. For example, you can create it on drive "C" and call it « irismovie ».
 |
Make sure you have several GB of free disk space on your hard drive before using Iris, as it will produce many files on your laptop. If you do not have such an area, you must rename the new sequences of images with the same nam, over-writing the previous image. Note, this prevents you from returning to a previous step if you are not satisfied with the result! |
Go to the submenu "Settings..." on the menu "File".
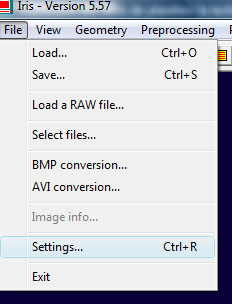
A window appears...
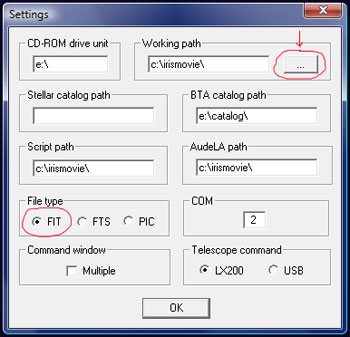
If you have created the folder « irismovie », the path of the working directory is « c:\irismovie\ ».
When processing a color video, it is more convenient to choose the image format PIC. For a video acquired with a B&W camera, you have the choice between PIC format and FIT format. The other fields are not relevant in this case. Click OK...
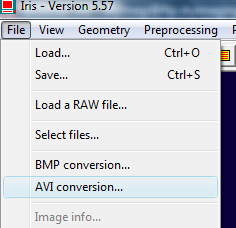
Open the "AVI conversion" dialog from the File menu.
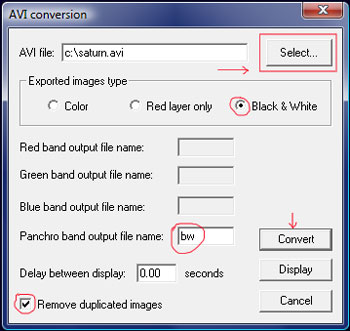
Indicate the location of the .avi file on your hard drive. For example: "C:\saturn.avi". If your video is B&W, check the option « Black&White » in the type of images exported. At the "Panchro band output file name" option, give the name "bw" to the video which will be produced, if you have a single black and white image of course (in the LRGB technique, the B&W image provides details). On the other hand, if you use the RGB technique (B&W camera + filters: 3 B&W videos generated, each representing a primary color), start by processing one of the 3 videos, such as the one created with the red filter, and give "red" as the generic name of the B&W file. Click "Convert".
Check the "Remove duplicated images" box so that Iris ignores identical images created by the computer when it can't absorb the high frame rate sent by the camera.
A confirmation window appears, click on "Yes" ![]()
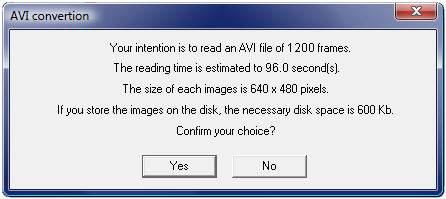
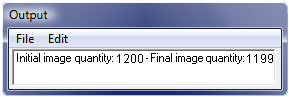
After converting the images, Iris shows the number of final images in the output window. In this example there are 1199 images. When the B&W sequence is converted (name "bw1 -> bw1199"), write down on a paper the number of final images that were converted by Iris.
In Iris, most operations are done through a commands editor that contains the various commands used during the many stages of processing. Start by displaying the first image using the command window (this is the 11th Iris button from the left, which is like two small paragraphs).
 You get this:
  This window is very important! You will use it during the entire processing!!!
![]()
>load bw1
(for convenience, all commands of the tutorial are black)
NB :
Next, determine the level "i" at the center of the Saturn's disk by launching the "stat" command and by clicking on the center of the globe:
>stat
In my case, I get i=231. Note this value returned by Iris on a piece of paper, it will be useful later!
The command window should look like this: 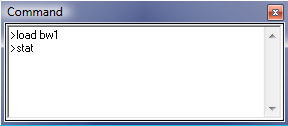
If you don't see spots in your images, continue the procedure (either by dealing with the field's rotation, or by normalizing the background of the sky (step 5) if you have an equatorial mount).
If on the other hand your images are affected by the presence of small spots, click here:
Moreover, if your telescope is in alt-azimuthal mode, you can compensate for the rotation of field that appears in the images (to increase the resolution of your final image).
To do this, click here:
![]() Skip this step if you process a video of the Moon.
Skip this step if you process a video of the Moon.
Normalize the background of the sky planetary images (if it hasn't already be done in the chapter dealing with dust (flats)). If you are a courageous person who has applied the "virtual" flat technique in Iris, you can skip this step because you've already done it! The principle is to choose a reference area of the image by selecting a small square in the sky background using the mouse, setting up normalization in order for it to become well black. The idea is to avoid the alteration of the useful part of the image, IE. the planet.
Three methods are available. Look through all of them and choose the one you prefer!
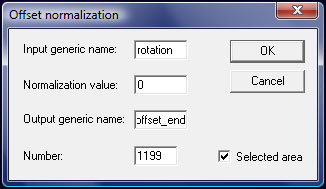
Go to the sub-menu "Offset normalization of a sequence" from the menu "Processing".
Enter the input generic name of the start sequence of images:
• « bw» if you decided not to remove dust and not to compensate rotation of field.
• « bwflat » if you have just made a real flat and have decided not to make a virtual flat with Iris.
• «rotation » if you compensated for the rotation of field.
The normalization value is set to 0. The output generic name is "bwflat_offset_end" and the number of images is 1199 (value to adapt to your video). Check the box «selected area» (to do this, you had to previously draw a small square in the background of the sky).
Start by drawing a small square in the background of the sky.
Then use the command "noffset3" from the command window of Iris. It is equivalent to the first method.
Syntax: noffset3 [input sequence] [output sequence] [normalization value set to 0] [number of images in the sequence]
Example:
>noffset3 rotation bwflat_offset_end 0 1199
From the outset sequence:
• « bw» if you decided not to remove dust and not compensate rotation of field.
• « bwflat » if you have just made a real flat and you have decided not to make a virtual flat with Iris.
• «rotation » if you just compensate for the rotation of field.
You can make a median offset to normalize the background of the sky. Once it's done, go to the submenu "Remove offset" from the menu "Preprocessing". Indicate according to your video:
Input generic name:
• « bw» if you decided not to remove dust and not to compensate rotation of field.
• « bwflat » if you have just made a real flat and have decided not to make a virtual flat with Iris.
• «rotation » if you compensated for the rotation of field.
Offset frame: offset_median
Output generic name: bwflat_offset_end
Number: 1199
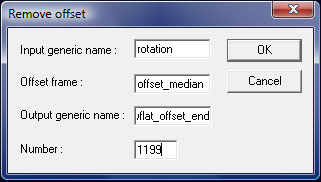
Example: the command line is:
>soust2 rotation offset_median bwflat_offset_end 0 1199
|
Then load the first image of the sequence:
>load bwflat_offset_end1
 What should we do if the first image is of poor quality?
You have two options: you can process your sequences of images manually or automatically. Here are some advantages and disadvantages of these 2 methods:
|
You now have to sort the images to keep only the best of them! ![]()
Two alternatives are available. If you have the time and want to maximize your video, choose the manual selection of images. Otherwise use the automatic method.
First, let me make a suggestion. The manual method is the most efficient, so that you can sort the images and obtain very good results compared to the automatic procedure... but it's also the most daunting! In order to avoid seeing the planet move on the sensor when browsing through the sequence, it's convenient to realign all images in relation to each other. This is the stage of registration. Then the planet will stay in the same place when we select the best images. It will be easier to evaluate the quality of each image compared to the others. If you don't do the registration now, you will have to do it later anyway.
It is possible that you have already done a registration if you've eliminated rotation of the field...thus it isn't necessary to do a new registration!
To do the image registration, click here: ![]() Registration
Registration ![]()
Then open the dialog box "Select images" on the "View" menu.
Set the generic name of the input video "bwflat_offset_end". If you are just doing the registration, your sequence to sort out is "sequence_registered"!
Then choose the generic name of the output sequence. For example: "saturn_hand".

Then click on the >> button to load the first image of the sequence. If you want to save it, click on "Save". Otherwise, check the next image by clicking again on >>. To return to the previous image at any time, click on <<.
Have patience! It really pays off... If at any time you feel like a zombie, relax, take a break. Gently rub your eyes, it will go better! ![]()
- After the first pass, we can further refine the selection, taking the sequence previously produced as the input sequence (don't forget to use another name for the output sequence).
- After the 3rd-pass (yes, I'm crazy! ![]() ), I now have 211 images out of the original 1199 from the first video, stored in the sequence «saturn_hand» (I had to rename it with another name as mentioned previously, but it's skipped to make the rest of the tutorial easier). So I kept a little less than 20% of total input images, which is not much... you have to find a happy medium. Generally, we like to keep 30% of the total.
), I now have 211 images out of the original 1199 from the first video, stored in the sequence «saturn_hand» (I had to rename it with another name as mentioned previously, but it's skipped to make the rest of the tutorial easier). So I kept a little less than 20% of total input images, which is not much... you have to find a happy medium. Generally, we like to keep 30% of the total.
After doing the manual selection, you can be proud of all your effort! ![]() To check your results, load multiple images of the sequence, by varying the index:
To check your results, load multiple images of the sequence, by varying the index:
> load saturn_hand1
Remember that you can always use the "Animate" window from the "View" menu.
This method uses commands "bestof" and "select".
 |
|
If the planet is small, you can use the mouse to define a rectangle around it to follow the movement of the planet in the video before launching "bestof". Iris performs its calculations inside this rectangle only, which reduces the duration of the operation and sometimes gives better results.
In simple terms :
Run:
> bestof bwflat_offset_end 211 (reminder for those who have compensated for the rotation of field: use the sequence "bw" from the very beginning!)
With 211 being the number of images you want to keep (you can change it, I used it because it corresponds to the number of images selected manually).
« bwflat_offset_end » is the name of the sequence you have acquired in step 5 (sky normalization)
Then sort the 479 images (example, different number in your video) selected by "bestof" in descending order of quality:
Syntax: select [input sequence][output sequence]
> select bwflat_offset_end saturn_computer
If you haven't eliminated the rotation of field or completed the manual selection of images, you must now register them, adding them together so that the planet doesn't move during the entire sequence.
To register the images, click here : ![]() Registration
Registration ![]()
Raw images of the video are often noisy, and useful information (details of the planet, ie the useful portion of the image) can be difficult to see. To improve the signal-to-noise ratio (S/N) it is necessary to add a large number of images together. Yes, BUT you realize that they are not all of the same quality, and you have a selection. It is now time to remove the undesireable images. To do this, load several successive images of the sequence by varying the index.
> load saturn_computer1
> add_norm saturn_computer 479
Suspense... the resulting image appears on the screen! Oh no, it's really ugly! There is no point to continue on your computer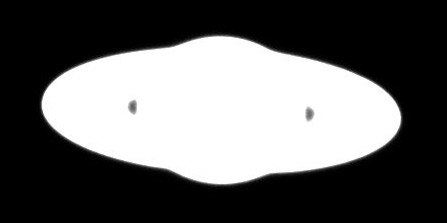
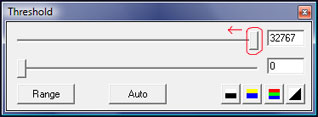
If the image that appears after the addition is much too light, you have to adjust the threshold with this magic command:
> visu 32767 0
The "visu" command restores the intensity of pixels of the image between extreme values accepted by Iris, namely the thresholds 0 and 32767.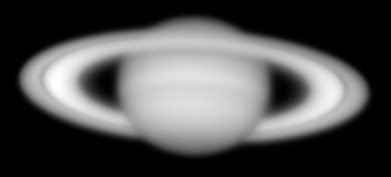
Then, save the result:
> save saturn
The preprocessing ends here. Now we have to deal with processing of the image by wavelets! You will finally be able to have fun!!!
![]()
9) Processing with wavelets
TIP:
As far as the Moon is concerned, ![]() the Vancittert processing
the Vancittert processing ![]() often generates better results.
often generates better results.
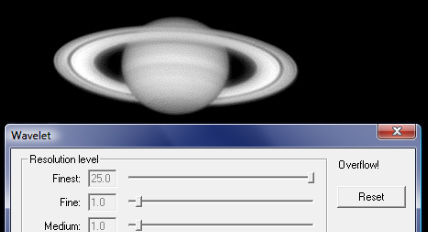
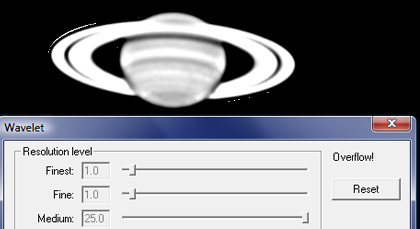
The main goal of wavelets is to break the image in several layers with different levels of detail and to apply an adapted processing on each layer. The "Finest" resolution level is the most popular because it contains the finer details of the image. Nevertheless, its handling leads to a significant increase in the level of noise. That's why it should be used on images taken with Black&White sensors. They are less noisy than their counterparts taken in color because they have a better signal to noise ratio. The "Fine" and "Medium" levels have details with lower resolution. These are the only 3 levels used in planetary imaging.
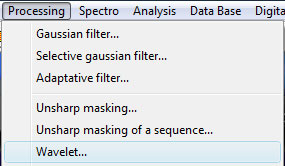
To process your image with the wavelets, go to the menu "Processing" > "Wavelet...".
 |
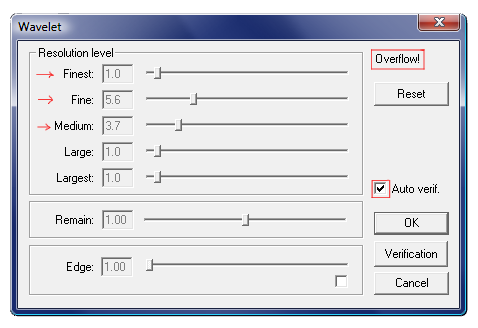 |
Select the "Auto verif." box and play with the sliders "Medium" and "Fine".
Since your web cam is in B&W, you can take advantage of this opportunity to test the "Finest" adjustment in addition to the "Fine", setting the "Medium" aside. The other levels are left to 1, it is not necessary to change the "Remain" and "Edge" settings.
Don't over-do the intensity of wavelet processing. The Cassini division on Saturn should remain fine and thin, as much as possible. It should not appear too thick because of excessive processing. Wavelets are used to bring out details that are already present in the image, nothing must be invented! Also, if the strength of processing is too high, artificial structures appear: they are artifacts.
 |
 |
| The finest level enhances details but it increases the level of noise. | The medium level has to be well balanced to avoid artifacts. |
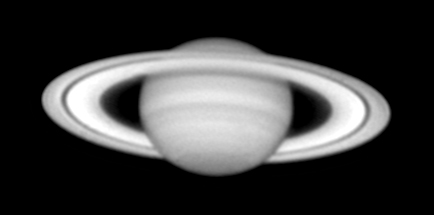
A technique which seems to be effective is to do a first pass with wavelets, then click "OK" and again apply a more moderate pass.
> mult 0.8
In my case, the message "Overflow" is generated by the presence of saturated rings, while the globe is balanced. Saturn was photographed on the day before opposition, when the planet is aligned with the Sun and Earth, at the moment Saturn is closest to us. Its image is affected by the Heiligenschein effect.
When Saturn is close to opposition, the brightness of the rings is much more pronounced than usual. Visually, Saturn's globe seems to be more dull than at other times, and that's what appears on my image as pixels saturated by light.
 |
|
| 1st version | 2nd version (no no, this is not the same!) |

![]() It took a lot of hard work to create this tutorial and I hope the result lives up to your expectations. However, I'm convinced it can still be improved with your feedback. Don't hesitate to post a comment in order to suggest another way to proceed, or if an eror was found, or simply if you like this tutorial. Thank you!
It took a lot of hard work to create this tutorial and I hope the result lives up to your expectations. However, I'm convinced it can still be improved with your feedback. Don't hesitate to post a comment in order to suggest another way to proceed, or if an eror was found, or simply if you like this tutorial. Thank you! ![]()
| Bibliography |
| Websites | Christian Buil | http://www.astrosurf.com/buil/us/iris/iris.htm |
| Philippe Cambre | http://www.astrosurf.com/halfie/ (in French) | |
| Joel Bavais | http://olympus.umh.ac.be/ciel.htm (in French) | |
| Jacques-André Regnier | http://www.regnier-schmit.net/astronomie/faq/ (in French) | |
| Books | Thierry Legault | Astrophotographie, Eyrolles Ed., 2006 |
| Patrick Lecureuil | Photographier le ciel en numérique, Vuibert Ed. , 2006 | |
| Magazines | Astronomie Magazine | Article about the levels & Photoshop - number 98, February 2008 |
| Thanks |
| Jean-Pierre Richaume | Thank him very much for his careful reading of the first version of the tutorial and his many useful tips :-) | http://perso.orange.fr/sirius.jpr/astro/pages/0.html (in French) |
| Marc Delcroix | A big thank you for his help on the rotation of field :-) | http://astrosurf.com/delcroix/ (in French) |
| Yann Duchemin | Thank him for his software Altaz :-) | http://yann.duchemin.free.fr/ (in French) |
| Kevin Bozard | Kevin edited numerous pages of this tutorial previously written in French to remove the mistakes. | http://www.kevinbozard.com/ |
| Tom Feuerstake | Tom edited numerous pages of this tutorial previously written in French to remove the mistakes. | Tom's website |
| Jean-Yves Beninger | He translated in English the page of the scripts for Iris. They enable you to automatically process your videos of the planets. | http://www.lesbeninger.com/jy.html |